Brinell test methods are defined in the following standards: ASTM E10 and ISO 6506. It is recommended that operators have a current copy of the relevant standards, which are updated regularly.
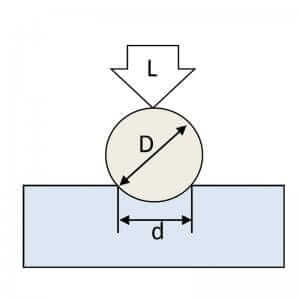
The Brinell hardness test consists of applying a constant load or force, usually between 187.5 and 3000Kgf, for a specified time (from 10 – 30 seconds) typically using a 2.5 or 10mm diameter tungsten carbide ball (see schematic in the image to your right – Figure 23.3).
The time under load (dwell) period is required to ensure that plastic flow of the metal has ceased. Lower forces and smaller diameter balls are also used in specific applications. Similar to Knoop and Vickers testing, the Brinell test applies only a single test force. After removal of the load, the resultant recovered round impression is measured across the indent at right angles using a low-power microscope or an automatic measuring device and the average value used to calculate hardness.
The actual Brinell hardness (HB) is calculated by factoring the indent size and the test force, such that:
HB = 2L / πD/2(D - √(D2 - d2))
Where L = load, D = diameter of the ball indenter and d=diameter of the impression.
It is not necessary to make the actual calculation for each test – calculation tables have been published for various combinations of diameters of impressions, load and ball size. In addition various forms of automatic Brinell reading devices are available to perform these tasks.
Applications
Brinell hardness testing is typically used in testing aluminum and copper alloys (at lower forces) and steels and cast irons at the higher force ranges. As the Brinell test uses relatively high loads, and therefore relatively large indent, it is frequently used to determine the hardness in circumstances where the overall material properties are being ascertained and local variations in hardness or surface conditions make other methods un- suitable, such as forgings or castings of large parts. Highly hardened steel or other materials are usually not tested by the Brinell method. As such, Brinell hardness testing machines (Wilson® BH3000 Brinell Hardness Tester) often manufactured to accommodate large parts such as engine castings and large diameter piping. A minimum material thickness of at least 8x the testing depth is recommended (ISO 6506).
Due to the wide number of ball sizes and loads available, it is possible to test a very wide range of hardness values using the Brinell method. This is constrained by the indenter ball itself, which can become deformed by testing harder materials.
It should be noted that there is a relationship between load and ball diameter (L/D2), whereby tests with load/indenter combinations having the same ratio give the equivalent HB values. Tests with different ratios are not comparable. Errors in Brinell measurement are usually attributable to poor surface condition or operator errors in optical measurement, but due to the large size of indent these errors tend to be limited.
For additional information on hardness testing, refer to the Buehler SumMet Guide.


